How Much Does It Cost to Manufacture Custom Cushion Covers in 2026?
Cushion covers are one of the smallest products in home décor, yet...

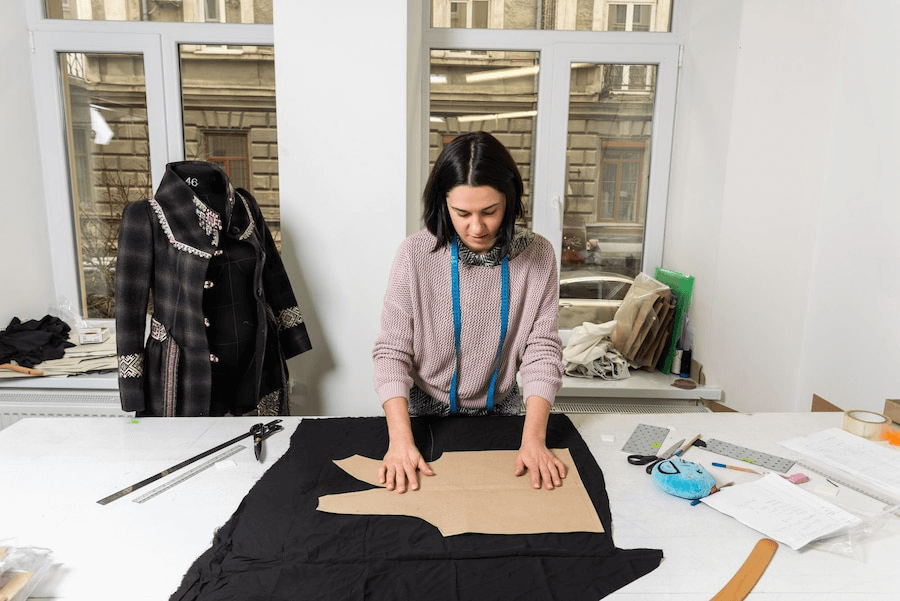
Pattern-making is an expert craft used in the manufacturing of apparel. With a small margin of error, clothes are made to specification with the attention to detail and skill that go into each pattern. Your sketches must be converted into technical drawings after you’ve designed your garments to start making patterns.
A marker is the configuration of all the pattern pieces over the section of material that has to be cut to reduce waste while keeping the intended grainlines. It resembles a pattern of patterns that will serve as the basis for all of the pieces’ cutting. After that, the layers of cloth are placed on top of the marker, and it is cut.
Numerous resources and experts are available to help individuals who are unfamiliar with fabric patterns. To find designers who can carry your ideas through to the development stage, Seams Apparel offers an easy-to-use search function.
You can decide on the size ranges of your clothing and visualize the fit with the aid of this crucial developmental stage. Patterns essentially act as a link between ideation and production, simplifying this process for the manufacturer and the brand.
Gain insight into the shape of your clothing by learning what grading is in pattern-making and marker-making. To elevate your preliminary sketches, consider some of the key components of this work of art.
What is meant by pattern grading? The process of creating patterns of various sizes from a master pattern using a given size chart is known as pattern grading. When creating a pattern for a piece of ready-to-wear clothing in multiple sizes, garment manufacturers usually employ grading as a technique. Increases (or decreases) are applied at certain points in a pattern to make each new pattern in another larger (or smaller) size to grade the pattern.
The process of manually or digitally adjusting your sample pattern from one size to another with the aid of a size specification chart—all without altering the original style, appearance, or shape—is known as garment pattern grading instead.
To create larger or smaller sizes, a master pattern piece is progressively increased or decreased, a process known as apparel pattern grading. The smallest or medium size can be the starting point. Though a design’s general shape and appearance remain unchanged, pattern grading rules modify the design’s overall size. Within computer-aided pattern grading systems, pattern construction takes place through internal calculation algorithms, also known as grading rules.
Complement pattern grading with accurate technical sketches
The primary concept of pattern grading is to modify a pattern’s size proportionately while keeping the garment’s fit and form intact.
The science of grading was historically developed in the 19th century due to mass production and the introduction of commercial patterns. It was necessary to grade a pattern to fit a variety of body types by offering different sizes. These days, designers and producers of apparel use a middle-sized pattern (usually a size S or M) as a starting point and adjust it to fit larger and smaller sizes.

How many types of pattern-grading methods are there? There are primarily three methods of pattern grading systems used in the clothing manufacturing industry. They are
A pattern template is used to create the desired range of sizes, one by one. At the proper intervals, marks are made around the master pattern, which are then combined to form a larger pattern.
A grading machine facilitates the process of creating the pattern set. The tool holds the master or basic pattern and moves it in both vertical and horizontal directions so that the proper edge can be traced.
There are two categories of manual pattern grading techniques used nowadays. These are listed below and are briefly described:
This is the simplest approach. To grade up or down is done by cutting the pattern and spreading the pieces by a predetermined amount. A pencil, measuring tape, ruler, and scissors are the only tools required.
The patterns are moved using this method at a fixed distance from one another. The designer redrew the outline to achieve the same outcomes as the earlier cut-and-spread method.
The quickest pattern-grading method is computed grading (CAD). However, when it initially came out, its use in the production process was limited to larger fashion or apparel manufacturers. CAD software is now more reasonably priced. With this technique, manufacturers can quickly obtain more accurate, precise, and detailed patterns.
It has evolved in tandem with the development of new technologies. It is thought to be the quickest approach. It digitizes the “cut and spread” and “pattern shifting” approaches using the same procedure.
Two modes of operation are available for computer-based grading systems:
Learn more about clothing pattern design

Finding a sewing pattern that precisely fits your body measurements is rare, but sewing clothes to express your style can be satisfying. Your measurements may occasionally put you in a different size. How do I grade patterns between sizes? This is the usefulness of grading between pattern sizes.
It is crucial to have precise measurements of your body before you start grading between pattern sizes. Using a flexible measuring tape, take your measurements for the chest, waist, and hips. Then, find the sizes that match your measurements by consulting the Seams Apparel size chart.
Because bodies vary and you don’t want to risk cutting out beautiful fabric only to find the garment doesn’t fit, it’s helpful to take your measurements regularly.
You can use the “size chart” and the “finished garment measurements” to help you choose a size. Because every sewing pattern is created with a different amount of ease in the garment, depending on the silhouette, some people will have a looser fit than others.
Examine your chosen pattern closely and note the range of sizes it covers. Consult the size chart as well as your body measurements. As previously stated, this can vary based on the item of clothing, the pattern manufacturer, and the style. After determining your body measurements, you can decide which size or sizes to cut.
Working from your largest measurement is usually the best option. For instance, if your hip-to-waist ratio is higher than your waist, you should cut a size larger for your hips than for your waist. You can then “grade” between those sizes to ensure that the garment fits your size and shape perfectly.
Sizing up or down is a great way to guarantee a perfect fit if your measurements are in between two sizes.
There are two ways to go about this: either trace off the pattern and grade as you go or make the necessary changes directly on your pattern piece if you’re using a printed PDF pattern.
Beginning with the sizes that match your upper and lower measurements, trace the pattern pieces. The pattern pieces should be laid out flat. Then, using a ruler, create fresh cutting lines that smoothly blend the sizes. Don’t forget to grade all pertinent pattern pieces. For instance, if you’re making a top with a front and a back, you should grade both of those pieces according to the size lines. Seam allowance is typically included in patterns, but you should always check to be sure.

Different types of pattern grading used in the process of creating patterns for clothing design include grading, drafting, and draping. In contrast to sketching a flat pattern on paper, drapery involves forming fabric directly on a dress form.
Measurements from sizing charts or precise measurements taken on an individual, garment, or body form are used. On paper, measurements are marked for the chest, waist, hips, and other body parts. To finish the pattern, construction lines are drawn. Design patterns or foundational elements, are created through drafting.
A two-dimensional piece of cloth is draped around a form and fitted to its shape to create a three-dimensional fabric pattern. To make the clothing comfortable to wear, ease of movement allowances are added. One benefit of draping is that, before cutting and sewing a garment piece, the designer can view the entire finished garment’s design effect on the body form. But compared to creating flat patterns, it is more costly and time-consuming. Either a human body or a stand can be draped.
It entails creating a basic, fitted pattern that fits a person or body shape comfortably and easily. The foundation for designing a flat pattern is a sloper. It’s an easy-to-fit pattern that allows for comfortable and easy movement of the body. Women’s clothing is made up of five fundamental pattern pieces. These consist of a basic neckline, a sleeve, a fitted skirt with darts on the front and back, and a snug-fitting bodice front and back.
Nonetheless, women’s styles shift a lot because fashion changes so often. Then, by adjusting these basic slopers, styles can be put together. These days, computer assistance techniques are also used to test drapes. Since a basic sloper has no seam allowances, modifying it into different styles is made easier. It only has construction lines marked on it; it has no design interest. The fundamental design of a sloper must allow for the easy introduction of modifications. Precise measurements are crucial for creating a well-made pattern.

A marker is a unique type of stencil used in the apparel industry that shows where to cut pattern pieces for one or more garments from multiple layers of fabric. The marker planner is the one who sets up the marker. The marker planner’s job is to efficiently arrange the pattern pieces so that the least amount of fabric is wasted. The pattern yield (material utilization) is the percentage of fabric that is cut into pieces. The piece arrangement is called a “tight marker” when the yield is high.
There exist diverse forms of marker-making within the apparel manufacturing sector. Other than this, there are primarily two kinds of marker creation: computerized and manual. Let’s examine their works now:
The most popular method of creating markers is by hand, and some small-scale production facilities continue to use this technique. When creating a marker by hand, the marker maker plans the marker’s layout using tangible patterns and a marker table. When planning the marker, the marker maker must take into account the width, length, and direction of the fabric’s grain in addition to the location of notches and other markings. Two primary categories of manual marker creation exist, namely:
Procedure for Making Markers by Hand
Today, the most popular technique for creating markers in the clothing industry is computerized marker making. In digital marker production, a computer program is used to plan the marker. The computer program is much faster and more accurate than the marker maker because it takes into account all of the same factors that the marker maker does by hand.
Two primary categories of computerized marker creation are available:
Computerized Process for Creating Markers

By meticulously positioning the pattern pieces on the fabric layout, marker-making reduces the amount of fabric wasted. This is crucial for mass production management in the fashion business, as even a tiny decrease in fabric waste can result in substantial cost savings.
By decreasing the time and effort needed to cut out the garment pieces, the creation of markers can aid in improving production efficiency. This is due to the excellent arrangement of the pattern pieces and the marker’s ability to cut through several layers of cloth at once.
By guaranteeing that the pattern pieces are always positioned correctly on the fabric, marker-making can help increase cutting accuracy. Producing top-notch clothing with uniform sizing depends on this.
There are many uses for marker making, and grading has benefits such as guaranteeing that clothing will fit people of all sizes comfortably. By saving time and minimizing fabric waste, grading can also assist companies in increasing the efficiency of their manufacturing processes.
Understand the role of different garment samples
What is the most popular grading method?
In terms of pattern grading, this approach is the simplest. To start, cut the pattern and spread the pieces to the correct size. You overlap the pieces to grade down, and you separate them to grade up. Scissors, tape, a pencil, and an inch-by-inch ruler are all you need.
What is the grade of fabric?
Each fabric’s grade determines how much it costs. The lower the grade, the less expensive the cloth. Several variables, including thread count, fiber type, fabric construction, durability, and weave complexity, affect the grade.
For what reason is pattern grading significant in the apparel industry?
Pattern grading facilitates the production of clothing for all body types by fashion designers. Selling clients clothes that fit properly is crucial for fashion designers. Generally speaking, individual interpretations of garment fit can vary.

To sum up, grading is an essential step in the pattern-making process that is applied to both basic blocks and completed patterns. It makes it possible to create garments that fit a range of body shapes and sizes. Although grading guidelines may change based on the final pattern or item, they always support clothing lines’ inclusivity and adaptability. With pattern grading, you can enter your measurements and create a draft of a pattern. By precisely drafting patterns based on your measurements and by using software, you save a lot of fitting trial and error in the sewing room. This ensures that a variety of clients in various sizes are catered to in fashion collections.
Cushion covers are one of the smallest products in home décor, yet...

Most people do not think about towels much, but nothing moves off...

Hats have quietly become one of the hardest working products in fashion...

Nobody thinks twice buying socks, which is exactly why they are such...

U.S. apparel manufacturing continues to attract brands looking for faster production cycles,...